ISO Overview
Last Updated on 2025-03-11ISO Image Overview
Feature
The ISO library provides a list of common operating systems for you to mount our default ISO or your custom ISO on your cloud servers. You are also encouraged to introduce new OS to the library.
Regional Availability
ISO is available for all cloud servers across all regions.
Role Permissions
| Role | Permissions |
|---|---|
| Owner | Access to LayerStack ISO library, Deploy & Rebuild Cloud Servers from ISO, Upload & Delete Custom ISO |
| Member | Access to LayerStack ISO library, Rebuild Cloud Servers from ISO, Upload & Delete Custom ISO |
| Billing Member | Access to LayerStack ISO library, Rebuild Cloud Servers from ISO, Upload & Delete Custom ISO |
| Billing Admin | Not Available |
Available ISO
- Ubuntu 16, 18, 19, 20, 22, 24
- Fedora 30, 32, 36, 39, 40
- Debian 8, 9, 10, 11, 12
- AlmaLinux 8, 9
- RockyLinux 8, 9
- CentOS 6, 7, 8
- Windows Server 2008 (English)
- Windows Server 2012 Standard/ Datacenter (English/繁體中文/简体中文)
- Windows Server 2016 Standard (English/ 繁體中文/简体中文)
- Windows Server 2019 Standard (English/繁體中文/简体中文)
- Windows Server 2022 Standard/ Datacenter (English/繁體中文/简体中文)
- Windows Server 2025 Standard/ Datacenter (English/繁體中文/简体中文)
- Windows 7 Professional (English)
- Windows 10 (English/ 繁體中文/简体中文)
- Windows 11 (English/ 繁體中文/简体中文)
- Windows Administrator Password Reset
- Elastix 2.4
- FreeBSD 11
- Linux System Rescue
- Acronis Backup
Limits
The root password of your cloud server will no longer be valid if you reinstall the operating system via an ISO.
A maximum of two 10GB custom ISO files can be uploaded.
Quick Start Guide
Mount ISO
Log in to LayerPanel , go to the Services section and click Cloud Servers button, and then click on the Cloud Servers on which you want to use an ISO file.
Click ISO.
Choose the desired ISO file, then click Mount ISO and Restart.
Detach ISO
Log in to LayerPanel , go to the Services section and click Cloud Servers. Select the Cloud Server you want to detach the ISO file from.
Click ISO.
Click Detach ISO button.
Upload Custom ISO
Log in to LayerPanel , go to the Services section and click Cloud Servers. Then, select the cloud server on which you want to use an ISO file.
Click ISO.
Click Upload and select one of the three options.
Choose URL:
File Location: Enter the HTTP download URL
File Name: Enter your ISO name (E.g CentOS8)
Example: http://xxx.com/pub/Linux/centos/8/xxx.isoNOTE: If your ISO file is stored in an FTP server, you need to use the FTP method and change the URL from http:// to ftp://.
Example:
http://ftp.xxx.hk/pub/Linux/centos/8/xxx.iso
needs to be change to
ftp://ftp.xxx.hk/pub/Linux/centos/8/xxx.isoChoose FTP:
File Location: Enter the FTP directory path
File Name: Enter your ISO name (E.g CentOS8)
FTP Login: Enter your FTP login username
FTP Password: Enter your FTP passwordExample: ftp://ftp.xxx.hk/pub/Linux/centos/8/xxx.iso
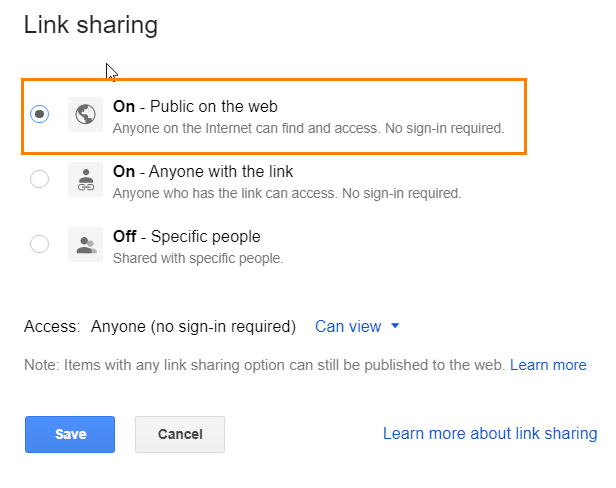
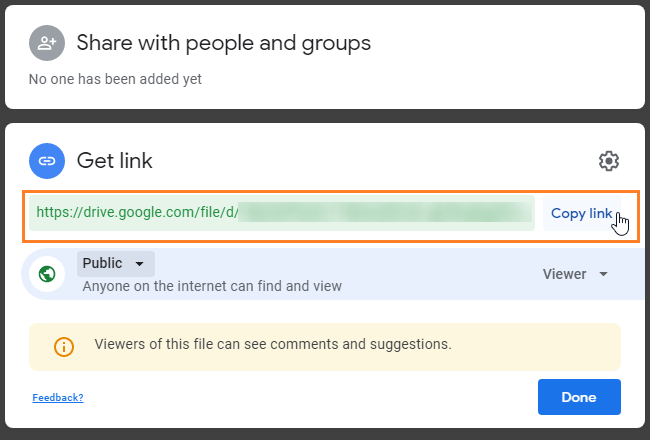
Choose Google Drive Link:
File Location: Enter the HTTP download URL
File Name: Enter your ISO name (E.g CentOS8)Example: https://drive.google.com/file/xxx/view?usp=sharing
NOTE: Make sure to select Public on the web because the connection is public between your computer and our server.
Once the upload process is completed, click Switch and select your custom ISO file.
After the installation is completed, you may detach & delete ISO file from the ISO option.
Related Tutorials
Install Custom OS template
Reset Administrator Password for Windows OS
Rescue OS
Process Acronis Backup Recovery