How to troubleshoot SSH connectivity issues
The SSH (Secure Shell or Secure Socket Shell) is a service that provides a secure way for users and system administrators to access a server over an insecure network. In some cases, the server cannot be accessed via SSH or the SSH service becomes refused the connection which needs to be further investigated.
Before proceeding with SSH troubleshooting, you need to make sure that:
There are no SSH access restriction rules set on the firewall level in the LayerPanel & server-side.
Your server is working correctly through the
Consolein the LayerPanel as follows.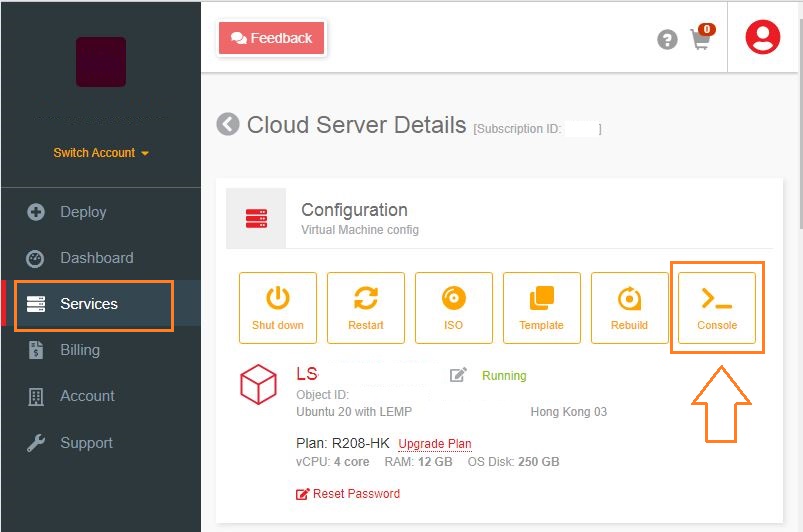
Troubleshooting SSH Connectivity Issues
Remote Hostname Identification Error
You may get errors like the below ones when trying to access through SSH:
Remote Host Identification Has Changed

OR

ssh: Could not resolve hostname: Name or service not known

OR

Unable to open a connection to Host does not exist
A hostname error may occur when a host fails to connect to SSH using a specific network address.
To resolve such errors, you may follow the steps below:
Check if the hostname is correct.
Check if the hostname has ping.
If the hostname is not resolving properly, you can use the public IP address for SSH as below, where the user is the SSH username that you use and 123.123.123.123 is the server IP.
# ssh [email protected]
Connection Timeout Error
This error shows up when a user tries to connect to a server, but the server refuses to establish the connection within a specified timeout period.
The common error messages in such cases are as below:
Error output
ssh: connect to host 123.123.123.123 port 22: connection timed out

OR

PuTTY error output
Network error: Connection time out
To correct this error, follow the below steps.
Make sure that the server IP address is correctly typed in.
Confirm that your network allows SSH port connectivity.
Verify that the firewall rules on your VPS are not at fault.
Connection Failure
Connection failure and timeout are both different. A connection failure occurs when your SSH request reaches the SSH port but the server refuses to accept it.
In this case, you may see the below errors:
Error output
ssh: connect to host 123.123.123.123 port 22: connection refused

OR

PuTTY error output
Network error: Connection refused
The resolution steps for connection failure are like those of connection timeout. To correct this error, use the following steps.
Make sure that the IP address of the server is correct.
Confirm that your network allows SSH connection.
Verify that the server firewall rules allow SSH access.
Basic solutions to troubleshoot SSH connectivity
Firewall Configuration Checking
One of the common causes of SSH connectivity is firewall blocking and firewall applications differ between various OS being used in the server.
With CentOS7, it is
firewalld, whereas, with Ubuntu, it isufw. If these are not present in the server, probably it is usingiptables.The firewall rules in your server can be listed using the below command with sudo or as the root user.
# iptables -nL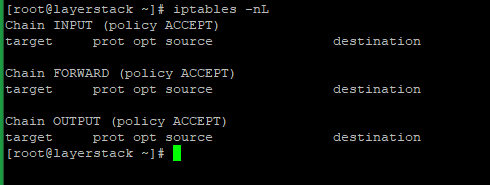
If there are any REJECT or DROP rules, you should ensure that the INPUT chain allows the default SSH port 22.
The below command will show the list of services supported by
firewalld.# firewall-cmd --list-services
If you are using a custom port for SSH, you can check with the --list-ports option.
In Ubuntu servers, with ufw installed, the below command can be used to check the firewall rules.
# ufw status
Status of SSH Checking
If you face any issues when connecting to a server using SSH, the first thing is to make sure that the SSH server is up and running. You can use the below commands to check the status of the SSH service in the server.
For older OS systems such as Ubuntu 14.04, Debian 8, or CentOS 6, use the service command.
# service ssh status
For new versions, use the systemctl command.# systemctl status sshd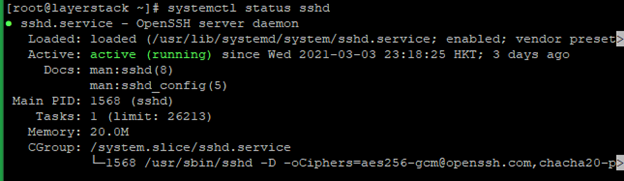
In case if the SSH service isn’t executing or active, the below commands can be used to start the service depending on the OS system.
# systemctl start sshd

OR

# service ssh start
SSH Port Checking
The default SSH port in all OS systems is 22. You can also use a custom SSH port, which can be set in the configuration file of the SSH service located at the path /etc/ssh/sshd_config.
Use the below command to check on the SSH port being used in the server:
# grep -i port /etc/ssh/sshd_config
You can also use the netstat command to check on the port that is being used by the SSH service. Execute the below command and the output should show up in the SSH port.
# netstat -ntlp | grep sshd
Basic solutions to troubleshoot rejected SSH login
For checking on issues related to SSH rejecting login attempts, the below guidelines can be followed.
Checking whether Root Login is permitted
SSH service can be configured to disable logins for the root user. To check if root login is permitted or not, run the below command:
# grep PermitRootLogin /etc/ssh/sshd_config
If it is not permitted, set the value of PermitRootLogin in /etc/ssh/sshd_config to yes as in the above image, restart SSH, and try logging in as root again.
Run the below command to restart the SSH service.
# systemctl restart sshd

OR

# service ssh restart
Checking whether Password Authentication is accepted
SSH can be configured to accept/not accept passwords and instead make use of public-key authentication. To check if password authentication is enabled or not, run the below command:
# grep PasswordAuthentication /etc/ssh/sshd_config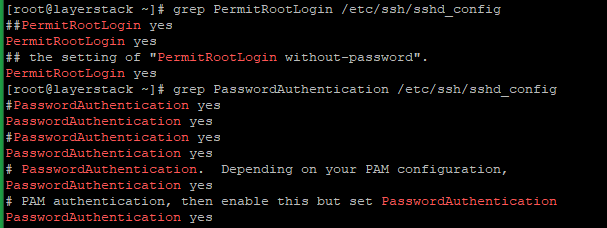
Set the value of PasswordAuthentication in /etc/ssh/sshd_config to yes as in the above image, restart SSH, and try logging in with your password again.
Run the below command to restart the SSH service.
# systemctl restart sshd

OR

# service ssh restart
Checking SSH public key stored on the server
If login attempts to your server using public-key authentication are not working, you need to make sure that the public key has been set inside your server. To view the public keys stored in your server, make use of the below command.
# cat ~/.ssh/authorized_keys
If your public key is not listed in this file, add it to the file on a new line.
On some servers, the location of the authorized keys may be different. Run the below command to see where the file is located:
# grep AuthorizedKeysFile /etc/ssh/sshd_config
Change SSH port to increase the server security
The server default SSH port is 22, and changing the server default SSH port means adding an extra layer of security to the server by reducing the risk of automated attacks.
Please note that the port numbers from 0-to-1023 are reserved for various system services. Hence, the recommended ports can use choosing port numbers between 1024 to 65535.
Edit the sshd configuration file and add a new Port.
# vi /etc/ssh/sshd_config

locate the line
Port 22
OR
#Port 22

And
Change to the new port number that you want to use and save the file.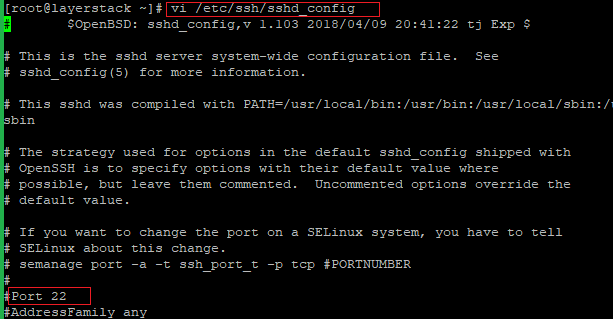
Now restart the SSH services in the server, using the following commands that depend on the OS system.
# systemctl restart sshd

OR

# service ssh restart
Update the server firewall rules with a new SSH port.
For Ubuntu, the default firewall is UFW, and please use the following command to add the new rule.
# sudo ufw allow 4444/tcpFor CentOS, the default firewall is FirewallD, and please use the following command to add the new rule.
# firewall-cmd --permanent --zone=public --add-port=4444/tcp

# firewall-cmd --reload
Connect the server using the new SSH port.
Please use the “-p” option (
) to specify the port while connecting the server from the SSH client terminal. # ssh username@server_ipaddress -p 4444NOTE: Change the port number 4444 with your original custom port number
Related Tutorials
How to install and configure CSF (Config Server Firewall) on Ubuntu 20.04 LTS
How to set up & configure Ubuntu Firewall (UFW) for Ubuntu 18
How to set up & configure firewall using FirewallD for CentOS 8
Firewall Configuration using Iptables with Advanced Security on Ubuntu 14.04
Linux SSH Security Best Practices to secure your Cloud Servers
How to test Firewall Configuration with Nmap on Linux Cloud Servers
Setting up SSH keys authentication for Linux Cloud Servers (LayerPanel v2.0)
