Setting up SSH keys authentication for Linux Cloud Servers (LayerPanel v2.0)
SSH keys give added security to SSH in the sense that a password need not be used when making use of SSH keys. SSH key pair comprises both a public key and a private key, both of which are a long string of characters. The public key is saved in the server to which SSH connection is to be done and the private key is stored on the system from which SSH connection is requested.
The below steps can be followed to set up SSH Key-based authentication for all Linux OS.
1. Create SSH Key pair
On the server from which SSH connection is requested, make use of the below command to generate a key pair.
# ssh-keygen -t rsa
A sample output of this command will be as below:
ssh-keygen -t rsa
Generating public/private rsa key pair.
Enter file in which to save the key (/home/layerstack/.ssh/id_rsa):
Enter passphrase (empty for no passphrase):
Enter same passphrase again:
Your identification has been saved in /home/layerstack/.ssh/id_rsa.
Your public key has been saved in /home/layerstack/.ssh/id_rsa.pub.
The key fingerprint is:
SHA256:q5CKez4qSUCNiNbuNfy8B+3+XtCc9b/WYMp9WX6k7kw layerstack@DESKTOP-8UVUO7D
The key's randomart image is:
+---[RSA 2048]----+
|o +              |
|o+ o             |
|o . .          . |
|.  . +      o o .|
|. . . + S  . +  .|
| . . . + o  . o +|
|..  o   =  . =E==|
|o.o. . o o  +ooo*|
|==o.  . o.oo o=o.|
+----[SHA256]-----+
You may give a passphrase (password) at the time of key pair generation when prompted to. The passphrase adds extra security for the SSH key pair.
Once the command has been executed, the public key will be stored accordingly as
id_rsa.puband the private key asid_rsain the path that has been specified at the time of key pair generation.
The generated public key can be viewed by using the below command:
# cat ~/.ssh/id_rsa.pub
The public key would be in the general format as below:ssh-rsa AAAAB3NzaC1yc2EAAAADAQABAAABAQDtUTqFBAieOxYT646CTBFAStnA0BntXji7tvBQT91Y1+H+9MzXwbOZ8lFYHhsWFHYlNrXKdMi4R9y2zxfEd7n+uX/u7Pgu0qAyXHeIwk6UDOpyyhK6rWX/9Yeg4jmJopgChNACtzZlQEyfO7rTlk6XKFam5bgM6LJntdysSUf2YBD+fRBXeCo5V2mlVlhjUmXh3dKlsFoPQrSxilH2W1aqjzZUDM+tqRvHn7knXIkChYTtgFj+TTacb95OF3T0c4SbnpUzQLr9Zl6kVQ8wlCgJ0vi6JVob+dsx6jnAREi3+UXYuj13FD31IPA0NX/rtY8+x7vqB6KxYRstoGUAeAiDD root@layerstack
2. Set up custom startup script for remote server
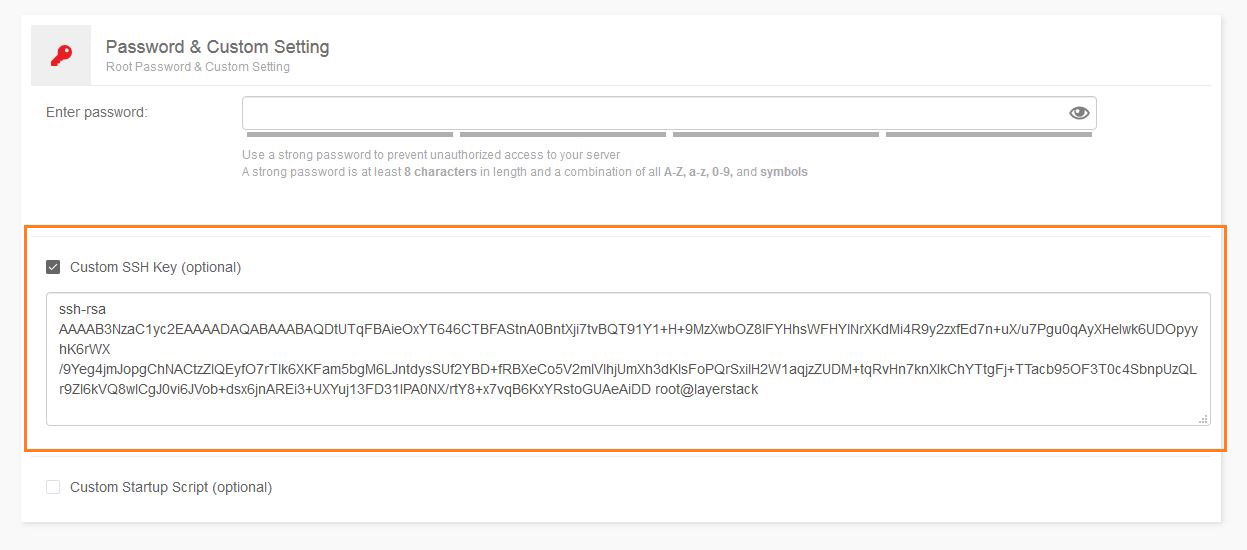
In the LayerPanel v2.0, there is an option to copy over the public key that has been generated directly at the time of server deployment.
Scroll down to the section at the time of deploying the server, until you see the
Password & Custom Settingoption. Click the check box forCustom SSH Key (optional).In the
Custom SSH Keyfield, paste the generated public key.

- Once the public key has been entered in and the server deployed, this public key will automatically be set inside the newly deployed server.
Note 1: If the wrong SSH public key is input at the time of order placement, the public key would then need to be manually copied over as specified in the NEXT STEP.
Note 2: Skip step 3 if you have already configured the SSH key correctly via
LayerPanel 2.0as specified above.
3. Copy the public key to the remote server
The public id_rsa.pub key needs to be copied to the server to which the SSH connection is to be made.
For this, there are two available options.
Use the
ssh-copy-idcommand as below, whereuseris the username with which you are connecting to the server with IP address 123.123.123.123.# ssh-copy-id [email protected]
Note 3:The ssh-copy-id utility will connect to the account on the server 123.123.123.123 and then will copy the contents of the
~/.ssh/id_rsa.pubkey into a file in the remote account’s home~/.ssh directorycalledauthorized_keys.
Copy the public key to the
authorized_keysfile located inside the.sshfolder in your server 123.123.123.123.# cat ~/.ssh/id_rsa.pub | ssh [email protected] "mkdir -p ~/.ssh && cat >> ~/.ssh/authorized_keys
4. Test the SSH connection
Once the public key has been added to the server, you can test the SSH connection to the server from the computer which has the private key, using the below command.
# ssh [email protected]
You may see a message like this:
The authenticity of host ‘123.123.123.123’ can't be established.

ECDSA key fingerprint is fd:fd:d4:f9:77:fe:73:84:e1:55:00:ad:d6:6d:22:fe.

Are you sure you want to continue connecting (yes/no)? Yes
This just means that your local computer does not recognize the remote host. This will happen the first time you connect to a new host. Type
yesand pressENTERto continue.There will not be any prompt for the password. However, you may be prompted to enter the passphrase, if it had been set at the time of SSH key pair generation.
5. Disable SSH direct root login (Optional)
Once you have confirmed that the server is accessible using SSH key pair, you can proceed to disable direct root login to your server through SSH.
For this, the below steps can be followed.
Open the SSH configuration file.
# /etc/ssh/sshd_configChange the value of
PermitRootLogintono.Restart SSH service.
# service sshd restart
