Installing Apache web server on Linux Cloud Servers
The Apache web server is an open-source HTTP server for modern operating systems including Linux and Windows. It is the most popular web server on the Internet. The configuration file of Apache and the installation method vary according to different distributions of Linux. But the default document root is /var/www/html in all distributions.
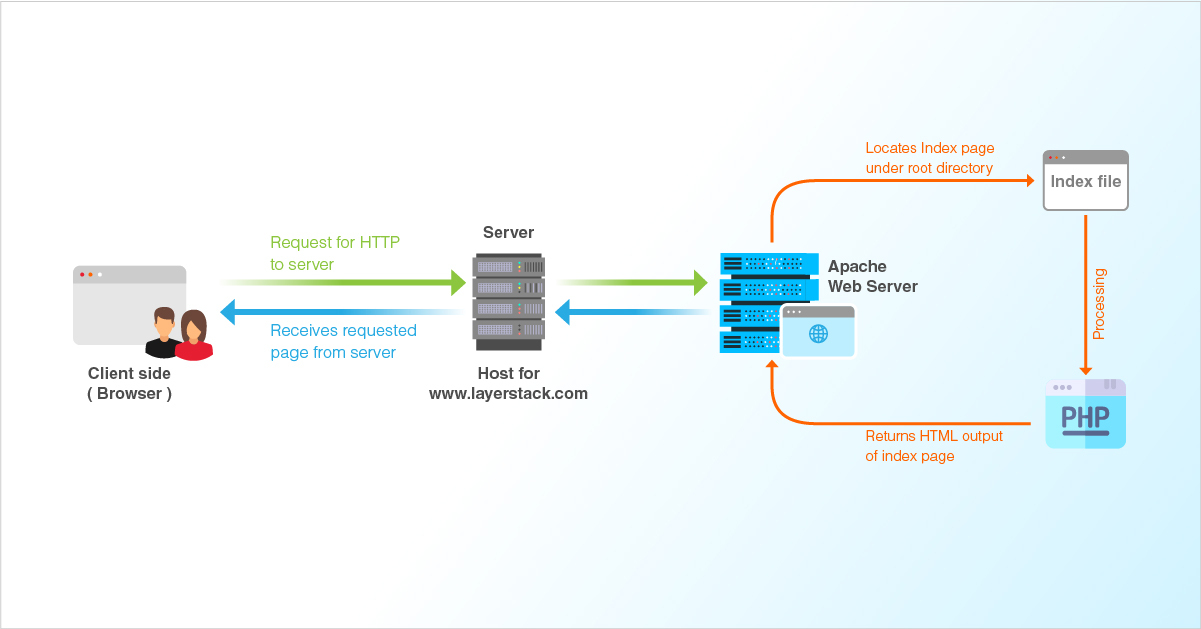
Debian and Ubuntu distributions refer to Apache as “Apache2” and the configuration file of Apache2 is /etc/apache2/apache2.conf.
CentOS refer to Apache as httpd and configuration file of httpd is /etc/httpd/httpd.conf.
After installation is completed, you can check whether Apache is installed or not by entering a server IP address into your browser’s address bar:
http://your_server_ip
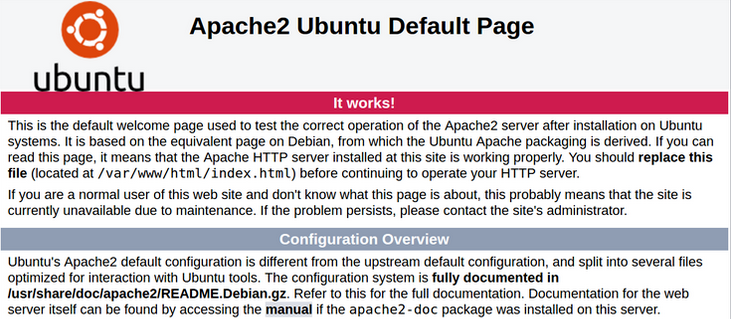
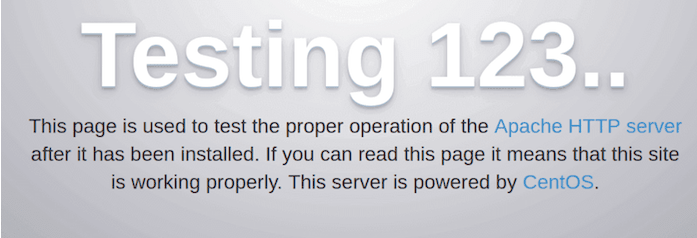
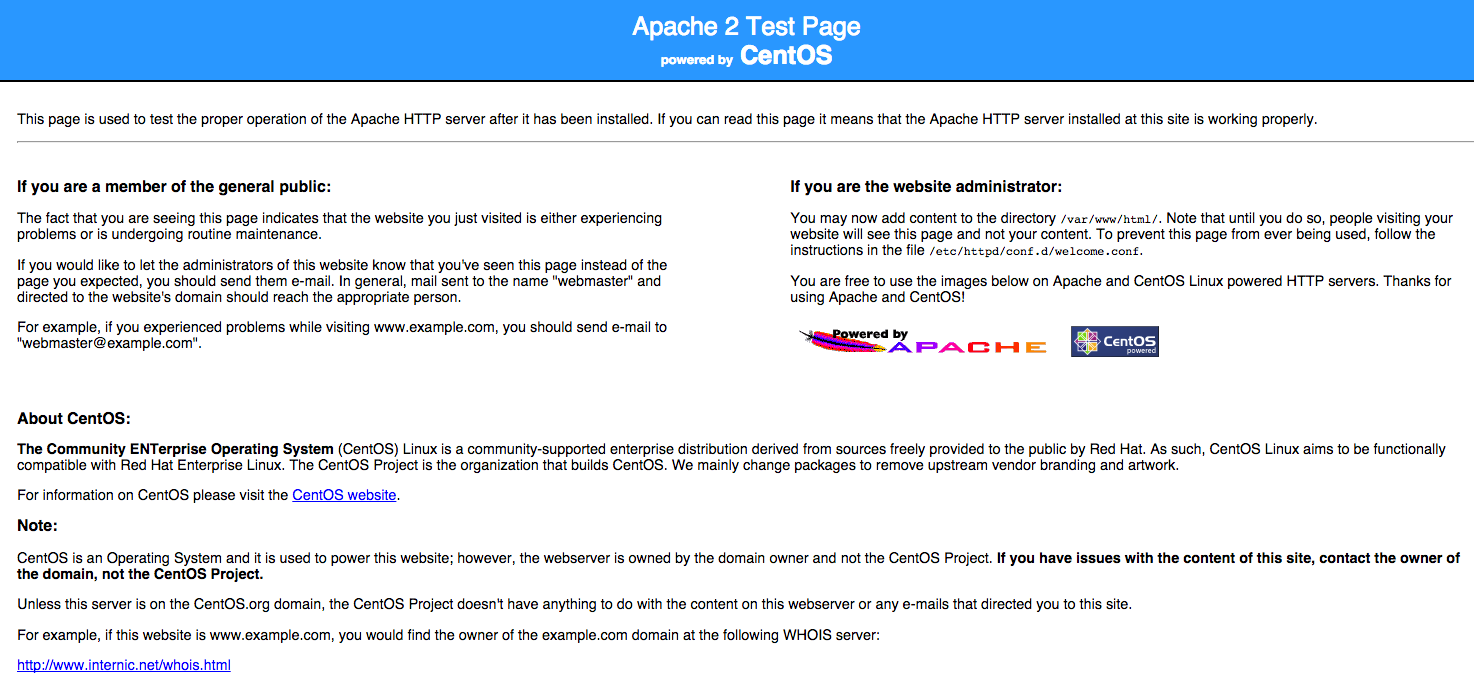
You can see the default Apache web page as shown below if it is successfully installed.

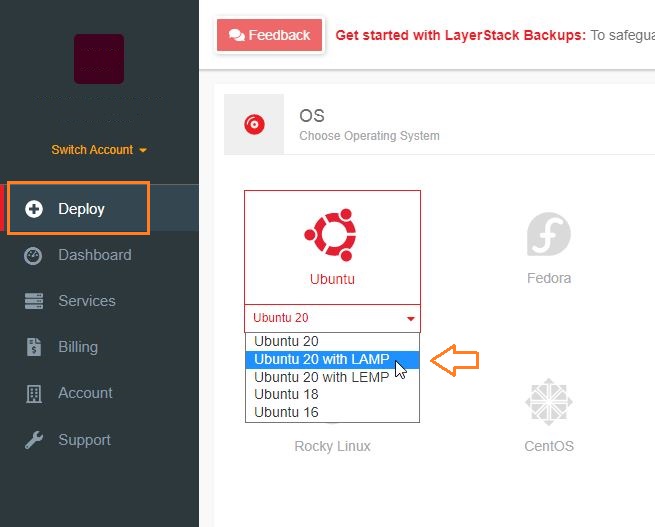
LayerStack customers can deploy Cloud Servers using Ubuntu 20 with LAMP OS via LayerPanel which already includes Apache, MySQL and PHP services inside the default OS as follows.
Also, you may check the following instructions for installing, configuring and testing Apache server on Debian, Ubuntu and CentOS below.
Ubuntu & Debian
Install Apache server
Run the following command to install Apache.
# apt-get install apache2Run the following command to start the Apache process.
# /etc/init.d/apache2 startVerify that the service is running by executing the following command.
# /etc/init.d/apache2 statusRun the following command to restart Apache.
# /etc/init.d/apache2 restart
Configure Apache server
The next step is to set up the web server configuration for the domain. The Apache configuration directory is /etc/apache2 and apache2.conf is main Apache configuration file. Each domain needs its own Virtual Host configuration file.
The configuration files use the .conf extension, and need to be saved in the /etc/apache2/sites-available/ directory.
Create a file at
/etc/apache2/sites-available/yourdomain.com.confand add the following lines to it.# nano /etc/apache2/sites-available/yourdomain.com.conf <virtualhost *:80=""> ServerAdmin webmaster@localhost ServerName yourdomain.com ServerAlias www.yourdomain.com DocumentRoot /var/www/yourdomain.com ErrorLog ${APACHE_LOG_DIR}/error.log CustomLog ${APACHE_LOG_DIR}/access.log combined </virtualhost>Create a directory for the website and then create
index.htmlfile for the website.# mkdir /var/www/yourdomain.comAdd some content to
index.html.# vi /var/www/yourdomain.com/index.htmlRestart Apache service for the above changes to take effect.
# /etc/init.d/apache2 restart
or
# sudo systemctl restart apache2
Open any browser and enter the website URL.
http://yourdomain.com
Test Apache server
The Apache web server can be tested by entering the server IP address into the browser’s address bar:
http://your_server_ip
CentOS 7/8
Install Apache server
Run the following command to install Apache.
# yum install httpdApache does not start automatically even after the installation is completed. Run the following command to start the Apache process.
# systemctl start httpdVerify that the service is running by executing the following command.
# systemctl status httpdRun the following command to restart Apache.
# systemctl restart httpd
Configure Apache server
The next step is to add and update the VirtualHost for a new domain in Apache. Each domain needs its own configuration file. The configuration files use the .conf extension, and need to be saved in the /etc/httpd/conf.d/ directory.
In the below example, yourdomain.com needs to be replaced with the actual name of the website.
Create a file at
/etc/httpd/conf.d/yourdomain.com.confand add the following lines to it.# vi /etc/httpd/conf.d/yourdomain.com.conf <virtualhost *:80=""> ServerAdmin [email protected] ServerName yourdomain.com ServerAlias www.yourdomain.com DocumentRoot /var/www/html/yourdomain.com/ ErrorLog /var/log/httpd/yourdomain.com/error.log CustomLog /var/log/httpd/yourdomain.com/access.log combined </virtualhost>Create a directory for the website and then create
index.htmlfile for the website.# mkdir /var/www/html/yourdomain.comAdd some content to
index.html.# vi /var/www/html/yourdomain.com/index.htmlRestart Apache service for the above changes to take effect.
# systemctl restart httpdOpen any browser and enter the website URL.
http://yourdomain.com
Test Apache server
The Apache web server can be tested by entering the server IP address into the browser’s address bar:
http://your_server_ip
CentOS 6
Install Apache server
Run the following command to install Apache.
# yum install httpdRun the following command to start the Apache process.
# service httpd startVerify that the service is running by executing the following command.
# service httpd statusRun the following command to restart Apache.
# service httpd restart
Configure Apache server
The next step is to set up the web server configuration for the domain. The configuration files name is httpd.conf, and the Apache configuration directory location is /etc/httpd/.
Open the apache configuration file which is
/etc/httpd/conf/httpd.confand add the following lines to the bottom of the file.# vi /etc/httpd/conf/httpd.conf <virtualhost *:80=""> ServerAdmin [email protected] ServerName yourdomain.com DocumentRoot /var/www/html/yourdomain.com/ ErrorLog /var/log/httpd/yourdomain.com/error.log CustomLog /var/log/httpd/yourdomain.com/access.log combined </virtualhost>Create a directory for the website and then create
index.htmlfile for the website.# mkdir /var/www/html/yourdomain.comNow add some content to
index.html.# vi /var/www/html/yourdomain.com/index.htmlRestart Apache service for the above changes to take effect.
# service httpd restartOpen any browser and enter the website URL.
http://yourdomain.com
Test Apache server
The Apache web server can be tested by entering the server IP address into the browser’s address bar:
http://your_server_ip
Related Tutorials
