SSL Certificates with IIS web server on Windows Cloud Servers
The Secure Sockets Layer certificate (SSL Certificate) is small data files that digitally bind a cryptographic key to an organization’s details. When installed on a web server, it activates the padlock and the HTTPS protocol and allows secure connections from a web server to a browser.
The easiest way to secure your website is by using an SSL certificate and HTTPS. SSL installation involves three general steps, which are as below:
Generating a Certificate Signing Request (CSR)
Purchase of SSL certificate from an SSL vendor
Installation of SSL certificate in the server
See the instructions for generating CSR and processing SSL installation in the IIS server below.
Generate CSR file
Click
Start > Administrative Tools > Internet Information Services (IIS) ManagerIn the
Connectionspane, click theserver name.In the center pane, double click
Server CertificatesunderIISsection.In the
Actionsmenu in the right pane, clickCreate Certificate Request.In the
Request Certificatewindow, provide your information in theDistinguished Name Propertiespage and then clickNext.
Common name: Your fully qualified domain/website name.Organization: Your company’s legally registered name.Organizational unit: The name of your department within the organization.City/locality: The city where your company is located.State/province: The state/province where your company is located.Country/region: The country/region where your company is located. You can use the drop-down list to select your country.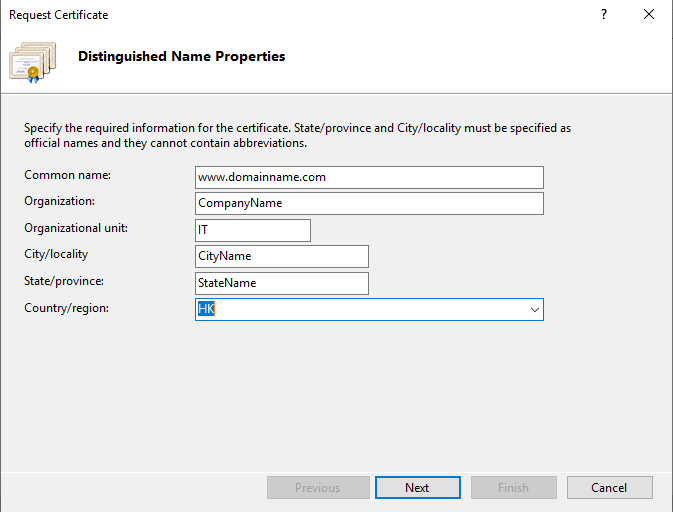
On the
Cryptographic Service Provider Propertiespage, selectMicrosoft RSA SChannel Cryptographic Provideras theCryptographic service providerand2048as theBit length, and then clickNext.On the
File Namepage, underSpecify a file name for the certificate request, you may specify a file name and save location for your CSR.Click
Finishonce done.The generated CSR can then be used to order the SSL certificate from a third-party SSL provider.
Install SSL Certificate
Once the SSL provider has issued and provided the certificate, you need to install and configure the SSL certificate in the server where the CSR was generated.
Save the SSL certificate .cer file that you have received from the SSL provider in the server where you generated the CSR.
Click
Start > Administrative Tools > Internet Information Services (IIS) Manager.In the
Connectionspane, click on the server name.In the center pane, double click
Server CertificatesunderIISsection.Click
Complete Certificate Requestin theActionsmenu (right pane).In the
Complete Certificate Requestwindow, on theSpecify Certificate Authority Responsepage, provide the below information:
File name containing the certificate authority's response: Locate the .cer SSL certificate file that you have saved in the server.Friendly name: A name used to identify the certificate.Select a certificate store for the new certificate: Select Personal, in the drop-down list.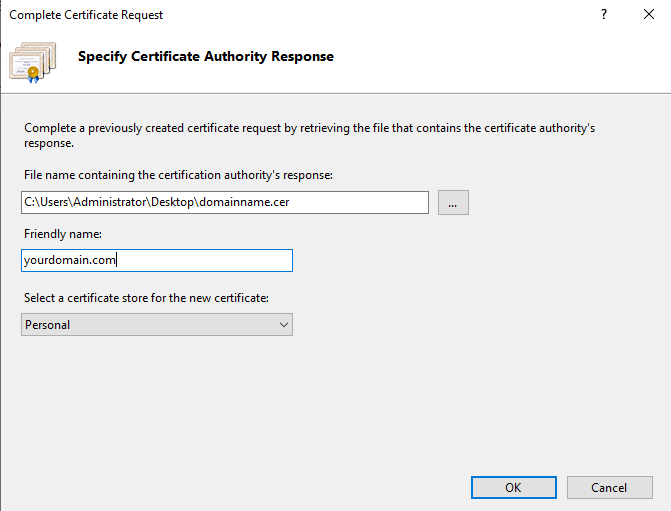
- Click
OKto install the certificate.
Now, that the SSL certificate has been installed on the server, you would need to configure your website to use it.
Configure website to use the installed SSL Certificate
In IIS Manager, in the Connections pane, expand the name of the server, expand
Sitesand then clickwebsiteyou want to secure using the SSL certificate.In the
Actionsmenu, clickBindings.In the
Site Bindingswindow, clickAdd.In the
Add Site Bindingwindow, specify the below settings and then click OK.
Type: SelectHTTPSfrom the drop-down listIP address: From the drop-down list, select the IP address of the website or selectAll Unassigned.Port: Type443(SSL uses port 443 to secure traffic.)SSL certificate: From the drop-down list, select the installed SSL certificate.
- Your website is now configured to use the newly installed SSL certificate.
Testing the SSL Certificate Installation
For best results, make sure to close your web browser first and then re-launch it.
Visit your site with the secure HTTPS URL (i.e., go to https://www.example.com, not http://www.example.com).
Related LayerStack Product
Related Tutorials
