How to configure the Static IP Address & Network Card for Linux & Windows Cloud Servers
Every Cloud Servers will include a public IP address through which the server can be accessed remotely. The IP can be set as either DHCP (automatic) configuration or static IP configuration. DHCP configuration detects IP address setting automatically, whereas static IP configuration requires the IP address settings to be manually set in the server.
This guide outlines the basic steps on how to configure the IP address of your server manually in your Linux or Windows Cloud Servers. The same steps can also be used to update the new IP address in the server manually.
Windows OS
Click
Start Menu, then clickControl Paneloption.Click
Network & Sharing Centeroption.Click
Change adapter settingsin the left panel.Right-click adapter with the name
Ethernetand selectProperties.In the properties window, select
Internet Protocol Version 4 (TCP/IPv4)and clickPropertiesbutton.Select
Use the following IP address:option and configure the static IP address.
Example for 203.86.232.249:
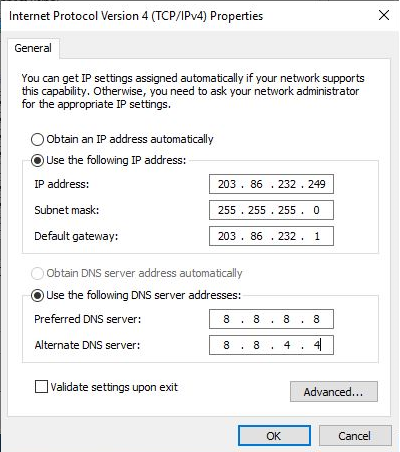
Note: The netmask is 255.255.255.0 and the gateway is 203.86.232.1.
Once IP and Subnet are entered, check the box
Validate Settings upon exit, clickOKand then close theEthernet propertywindow.Windows Network Diagnostic toolwill run to check to see any issues, close this window.To check if the static IP address is configured properly, right-click
Start Menu, then clickCommand Prompt.Execute the following command for checking network configuration.
# ipconfig
AlmaLinux
Edit the network configuration file using the below command.
# vi /etc/sysconfig/network-scripts/ifcfg-ens3NOTE: ens3 is the device name of the server. Please replace with the correct device name if necessary.
Change the value of BOOTPROTO to
staticfromdhcpand then add the following entries in the network card to configure the static IP address.Example for 203.86.232.249:
BOOTPROTO=static
DEFROUTE=yes
DEVICE=ens3
DNS1=8.8.8.8
GATEWAY=203.86.232.1
IPADDR=203.86.232.249
NETMASK=255.255.255.0
ONBOOT=yes
STARTMODE=auto
TYPE=Ethernet
USERCTL=no
Note: The netmask is 255.255.255.0 and the gateway is 203.86.232.1.
Save the file.
Restart the network service and make the changes effect.
# nmcli networking off
# nmcli networking on
Check the static IP address configured properly inside the network card.
# ip a
Rocky Linux
Edit the network configuration file using the below command.
# vi /etc/sysconfig/network-scripts/ifcfg-ens3NOTE: ens3 is the device name of the server. Please replace with the correct device name if necessary.
Change the value of BOOTPROTO to
staticfromdhcpand then add the following entries in the network card to configure the static IP address.Example for 203.86.232.142:
BOOTPROTO=static
DEFROUTE=yes
DEVICE=ens3
DNS1=8.8.8.8
GATEWAY=203.86.232.1
IPADDR=203.86.232.142
NETMASK=255.255.255.0
ONBOOT=yes
TYPE=Ethernet
USERCTL=no
Note: The netmask is 255.255.255.0 and the gateway is 203.86.232.1.
Save the file.
Restart the network service and make the changes effect.
# systemctl restart NetworkManagerCheck the static IP address configured properly inside the network card.
# ifconfig
Ubuntu
Edit the network configuration file using the below command.
# /etc/network/interfacesAdd the following entries for the network card and configure the static IP address.
Example for 203.86.232.249:
auto eth1
iface eth1 inet static
address 203.86.232.249
netmask 255.255.255.0
gateway 203.86.232.1
Note: The netmask is 255.255.255.0 and the gateway is 203.86.232.1.
Save the file.
Restart the network service and make the changes effect.
# systemctl restart network.serviceCheck the static IP address configured properly inside the network card.
# ifconfig
Ubuntu 17.10 and higher versions use NetPlan as the default network management tool and its configuration files are written in YAML syntax with a .yaml file extension.
Edit the network configuration file using the below command.
# vi /etc/netplan/50-cloud-init.yamlExample for 203.86.232.249:
network:
ethernets:
ens3:
dhcp4: no
dhcp6: no
addresses:
- 203.86.232.249/24
gateway4: 203.86.232.1
nameservers:
addresses: [1.1.1.1, 8.8.8.8]
optional: true
renderer: networkd
version: 2
NOTE: Change the name of the ethernet interface on your server.
Update networking with the below command and then the changes will take effect.
# netplan apply
Debian
Edit the network configuration file using the below command.
# /etc/network/interfacesAdd the following entries for the network card and configure the static IP address.
Example for 203.86.232.249:
auto ens4
iface ens4 inet static
address 203.86.232.249
netmask 255.255.255.0
gateway 203.86.232.1
Note: The netmask is 255.255.255.0 and the gateway is 203.86.232.1.
Save the file.
Restart the network service and make the changes effect.
# systemctl restart network.serviceCheck the static IP address configured properly inside the network card.
# ip addr
CentOS – 8
Edit the network configuration file using the below command.
# /etc/sysconfig/network-scripts/ifcfg-eth1Note: eth1/ens1 is the device name of the server. Please replace with the correct device name if necessary.
Change the value of BOOTPROTO to
staticfromdhcpand then add the following entries in the network card to configure the static IP address.Example for 203.86.232.249:
DEVICE=eth1
ONBOOT=yes
BOOTPROTO=static
IPADDR=203.86.232.249
NETMASK=255.255.255.0
GATEWAY=203.86.232.1
USERCTL=no
Note: The netmask is 255.255.255.0 and the gateway is 203.86.232.1.
Save the file.
Restart the network service and make the changes effect.
# systemctl restart NetworkManager.serviceCheck the static IP address configured properly inside the network card.
# ifconfig
CentOS – 6 / 7
Edit the network configuration file using the below command.
# /etc/sysconfig/network-scripts/ifcfg-eth1Note: eth1/ens1 is the device name of the server. Please replace with the correct device name if necessary.
Change the value of BOOTPROTO to
staticfromdhcpand then add the following entries in the network card to configure the static IP address.Example for 203.86.232.249:
DEVICE=eth1
ONBOOT=yes
BOOTPROTO=static
IPADDR=203.86.232.249
NETMASK=255.255.255.0
GATEWAY=203.86.232.1
USERCTL=no
Note: The netmask is 255.255.255.0 and the gateway is 203.86.232.1.
Save the file.
Restart the network service and make the changes effect.
# systemctl restart network.serviceCheck the static IP address configured properly inside the network card.
# ifconfig
Fedora
Edit the network configuration file using the below command.
# /etc/sysconfig/network-scripts/ifcfg-eth1Note: eth1/ens1 is the device name of the server. Please replace with the correct device name if necessary.
Change the value of BOOTPROTO to
staticfromdhcpand then add the following entries in the network card to configure the static IP address.Example for 203.86.232.249:
DEVICE=eth1
ONBOOT=yes
BOOTPROTO=static
IPADDR=203.86.232.249
NETMASK=255.255.255.0
GATEWAY=203.86.232.1
USERCTL=no
Note: The netmask is 255.255.255.0 and the gateway is 203.86.232.1.
Save the file.
Restart the network service and make the changes effect.
# systemctl restart NetworkManager.serviceCheck the static IP address configured properly inside the network card.
# ip a
Related Tutorials
How to assign multiple IP addresses to network adapter on Windows Cloud Servers
How to configure the Static IP Address & Network Card for Windows 2022 Cloud Servers
How to restart Network Interface / Network Adapter on Linux & Windows Cloud Servers
How to check TCP/IP configuration with ipconfig on Windows Cloud Servers
