How to configure Virtual Private Cloud (VPC)
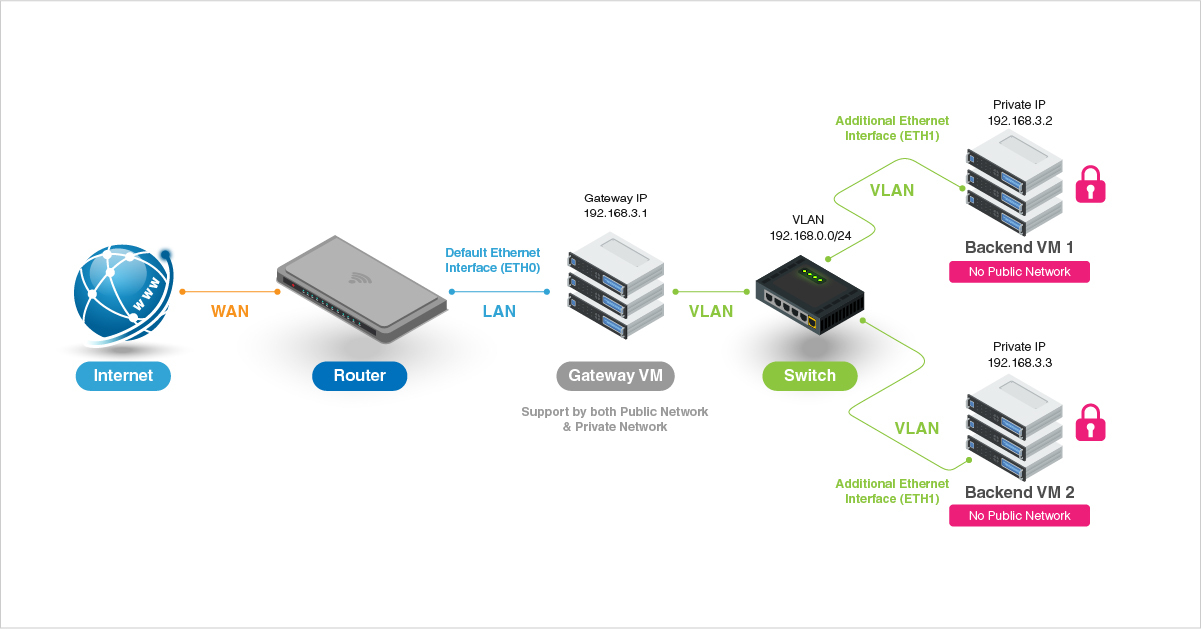
A Virtual Private Cloud (VPC) is a private network interface that makes the server practical, maximizing users' data privacy and security with truly isolated instances.
Due to the public disconnection of VPC, users cannot access the server & simply upload or download data via the public network (E.g. SSH), hence they can be benefited from optimized data protection by placing sensitive data and works in an isolated server.
See the instructions for configuring Gateway VM in Linux server and Backend VM in both Linux & Windows server below.
To configure Gateway VM for accessing both Public Network & Private Network (ONLY SUPPORTED IN LINUX CENTOS)
Setting up Gateway VM so that the VM acts as a router and forward packets to other Backend VMs through the private networking. This allows the gateway to route traffic between your Gateway VM & Backend VM.
Linux OS (CentOS)
Make sure to enable Private Networking from LayerPanel for your Gateway VM.

Access your Linux server by using either
SSH network protocol(E.g Using PuTTY) orConsoleoption in LayerPanel.Input the following command to run LayerStack's script for setting up VPC.
# ./vpc-gateway.shA prompt message will be shown asking if the Private Network has already been enabled in the panel, input
Yes.NOTE: The message “Your Private Network is not enabled” will be displayed if you did not do the first step.

Enter
VPC subnet prefixhere. For example, input 192.168.3.1 or 192.168.4.1 or 192.168.5.1, etc., and pressEnter. After this process, your VPC gateway setup should be completed now.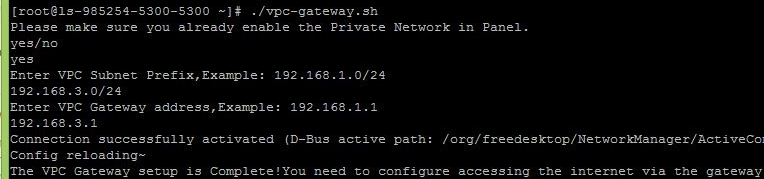
Now you may input the following command to check gateway status.
# ip a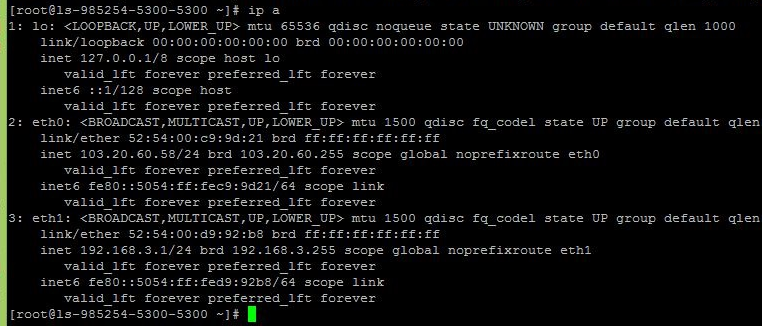
To configure Backend VM which ONLY accessing Private Network
Setting up Backend VM that accesses the internet via the gateway to only accept traffic from the gateway. Logging in the VM using Console is recommended in this case, since the SSH public connection will be dropped during the following configuration.
Linux OS (E.g. CentOS, Debian, Ubuntu)
Enable Private Networking from LayerPanel for your Backend VM.
Access your Linux server by using
Consoleoption in LayerPanel.Input the following command to configure the existing network card.
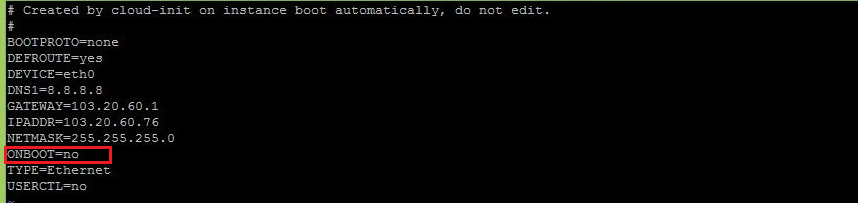
# vi /etc/sysconfig/network-scripts/ifcfg-eth0
For the option of ONBOOT in CentOS server, change the status from
yesintonoin order to disabling public network, and save it.NOTE: Your SSH connection will be disabled after processing this step.
NOTE: Do not need to process this step for Debian & Ubuntu servers.
Now input the following command to continue configuring the private network interface.
# vi /etc/sysconfig/network-scripts/ifcfg-eth1 (CentOS7/8)
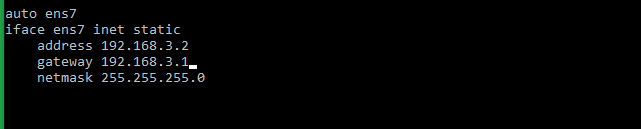
# vi /etc/network/interfaces (Ubuntu/Debian)
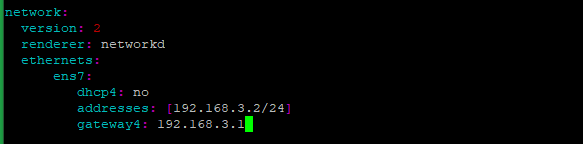
# vi /etc/netplan/50-cloud-init.yaml (Ubuntu 17 and higher using netplan)
Inside interfaces, update your private IP address (E.g. 192.168.3.2) and gateway (E.g 192.168.3.1) and save it.
The following IP ranges are suggested for use as private IP addresses:
10.0.0.0/8
172.16.0.0/16
192.168.0.0/24
NOTE: For the gateway setting, this IP is the same as another Gateway VM which you need to connect.
CentOS:
Ubuntu/Debian:
Ubuntu 17 and higher using netplan:
Input the following command and update default routing.
# vi /etc/sysconfig/network
In the network configuration settings, remove the option for gateway
GATEWAYDEV=eth0for CentOS server and save it.CentOS:

Then reboot the server for refreshing setting.
# reboot
Lastly, you may input the following command to confirm that this VM is connecting with your required VM.
# host myip.opendns.com resolver1.opendns.com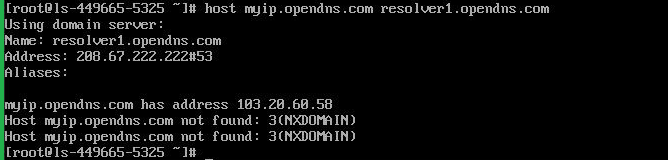
NOTE: You may repeat this setup on each of your backend VM.
Windows OS
Enable Private Networking from LayerPanel for your Backend VM.
Access your Windows server by using
Consoleoption in LayerPanel.- Click
Start Menu, then clickControl Paneloption. - Click
Network & Sharing Centeroption. - Click
Change adapter settingsin the left panel. - Right-click adapter with the name
Ethernet 2and selectProperties. - In the properties window, select
Internet Protocol Version 4 (TCP/IPv4)and clickPropertiesbutton. Select
Use the following IP address:option and configure the private IP address.
The following IP ranges are suggested for use as private IP addresses:
10.0.0.0/8
172.16.0.0/16
192.168.0.0/24
Example for 192.168.3.2:IP address: 192.168.3.2 Subnet mask: 255.255.255.0 Default gateway: 192.168.3.1
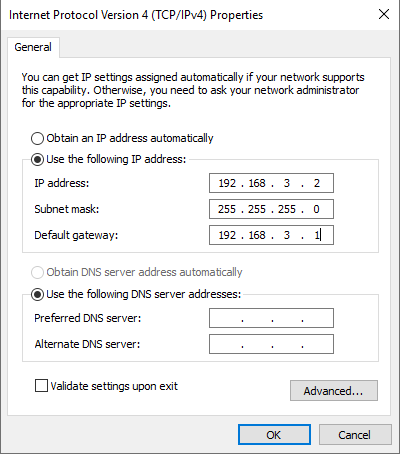
NOTE: The netmask of LayerStack private IP range is /24 subnet (255.255.255.0).
Once IP and Subnet are entered, check the box
Validate Settings upon exit, clickOKand then close theEthernet 2 property window.Windows Network Diagnostic toolwill run to check to see any issues, close this window.Now disable the public network for the server by right-clicking on the adapter with the name
Ethernetand then clickingdisable.NOTE: Your Remote Desktop connection will be disabled after processing this step.
To check if the private IP address is configured properly, right-click
Start Menu, then clickCommand Prompt.Execute the following command for checking network configuration.
# ipconfig
Related Tutorials
Related LayerStack Product
